
Writer/Director
+44 7484 136116
PROFESSIONAL PRACTICE
Animating Process
Before this project, I had never attempted doing animation except during a brief lesson on stop-motion using play dough back in year 3 and if I’m being completely honest, my decision to do animation for this project was driven mainly by my supreme desire to avoid starring in my own video more than it was a genuine interest in animation. However, considering the current circumstances, I was very limited with options and so an animated music video that I could complete from the desk in the room seemed the most obvious choice. Despite this, the process of making this music video has supplied me with a new interest as well as supplying me with a level of appreciation for animators that I didn’t previously possess.
FLIPACLIP
The app I decided to use to make my animated music video was FlipaClip which I discovered whilst searching through the AppStore. I chose it because it seemed very popular and was very well-reviewed by other users. I also noticed that the layout wasn't overly complex and seemed very simple and suitable for newcomers to animation such as myself.
1. This is the PEN TOOL. There are options for a PEN, a PENCIL, a PAINTBRUSH, and a HIGHLIGHTER. You are also able to adjust the colour, thickness, and transparency of the tool.
2. This is the ERASER TOOL. There are options to adjust the thickness of the eraser.
3. This is the LASSO TOOL. This enables you to select a specific part of the drawing.
4. This is the PAINT BUCKET TOOL. There are options to adjust the colour and the threshold.
5. This is the TEXT TOOL. There are options to change the font, size, and colour of the font.
6. This is the AUDIO TAB where external audio can be added to the animation.
7. This is essentially the TIMELINE where the frames are ordered.
8. This is the PLAY BUTTON where you can quickly watch back through the animation. You can also JUMP BACK to the beginning, or JUMP FORWARDS to the end.
9. This is the LAYER OPTION where multiple layers can be added and edited separately.
10. This is the SHAPE TOOL. There are options for a STRAIGHT LINE, a CIRCLE, and a SQUARE.
11/12. This is the COPY/ PASTE TOOL where elements of the frame can be copied and pasted.
13. This is the UNDO/ REDO button.
14. This button reverts the frame to its FULL SIZE.
15. OPTIONS BUTTON.
DRAWING SETUP
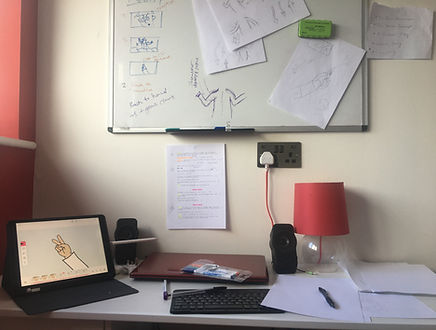
I drew the majority of the animation whilst sat at the desk in my bedroom as everything I needed whilst drawing was easily accessible.
For example, there are multiple plug sockets just above my desk which allowed me to charge either of my devices when I needed to and, unlike the Apple Pencil, I could easily continue drawing the animation whilst my iPad was plugged in which prevented me from wasting time whilst waiting for it to charge up.
I also have a whiteboard placed on the wall above my desk which was very helpful as I could practice drawing difficult parts of the animation and also plan and sketch what images I was going to draw in the future.
By drawing the animation here at my desk, it allowed me a casualness and comfort that greatly benefitted both the final outcome of the music video and also helped a great deal by relieving me of any stress as my schedule wasn’t dictated by anything else and I was able to pick up my iPad and start drawing whenever I wanted to.
MUSIC
Something that I discovered after a while of drawing was that I could record audio and place it into the animation to help me with synchronising the visuals with the audio. However, as I only discovered this feature a fair while into the drawing process, there were already roughly twenty seconds that I had drawn without influence from the song which was quite miraculous as, when watching the animation back with the song added, I discovered that everything I had already drawn synchronised almost perfectly with the song.

RECORDINGS OF DRAWING PROCESS
TITLE ANIMATION TONGUE ANIMATION
CLOUD ANIMATION ENDING ANIMATION
Something that I found whilst drawing the animation was that the things I expected to be very difficult to draw, were in fact, fairly simple, whereas the things I expected to be fairly simple were very difficult.
For example, I found great difficulty when drawing the movements of certain body parts. I found The simplest movements such as raising an arm, very difficult to draw face-on and so, to tackle this, I often found myself doing the motion that I was attempting to draw in the mirror to try and break down the different frames I would have to draw. This led to my phone camera roll being full to the brim of photos of me doing seemingly random movements with my arms and legs which, without context, made me seem as though I had lost my mind.
Another way I tackled this problem was by finding images online that showed the angle that I needed to draw and using them to trace onto the frame. This was very easy as the app showed a faint outline of the previous frame when you moved onto the next so that you could draw accurately in regards to the position of the previous frame and so all I needed to do was duplicate the frame I was drawing and then place the image from google where I wanted it to be so that I could then trace it through on the next frame before deleting the previous.
Here is a collection of all the images I used to help me when drawing. I used some of them to trace through as I mentioned previously, and some were simply to use as inspiration for locations, shots, and character designs:
Another thing that became frustrating was that I realised as I got further into the drawing process, that I started getting better at using the app and the images I drew became a lot better. Although this obviously sounds like a good thing, it was frustrating because every time I watched back through what I had drawn so far, the difference in quality became very noticeable and I really wanted to go back through and redraw the frames that weren't very good. However, because of the minimal time we were given to complete the project, I didn't manage to.
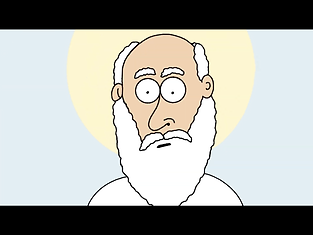
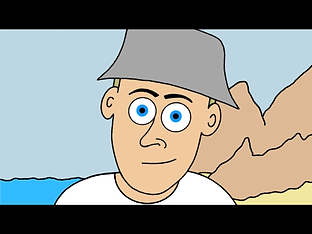
I was, however, able to improve the opening sequence before I began editing. By comparing the original opening sequence with my final version of it, it is easy to see how much I improved at drawing the animations.


ORIGINAL OPENING FINAL OPENING
FINAL PRODUCT
https://youtu.be/rYPw3HhiLWA
AUDIO COMMENTARY
AUDIO COMMENTARY TRANSCRIPT
IMAGE FOOTAGE LIST
C.U. PED UP PUSH-IN


WIDE C.U. REACTION


INSERT CUTAWAY


THE TRANSFORMATION


M.C.U. CUTAWAY REACTION POV


PUSH-IN E.C.U PULL BACK


M.S. M.C.U. M.S. INSERT


M.S. POV


AUDIO LIST
MAIN SONG
"Cigolettes Da La Banda Delle Libellule"
(Cimitero & Gigoletto & Cadillac - Carlotte's Galop)
by Nino Rota (from 8 1/2)
2:22 - 3:06
Downloaded from YouTube
https://youtu.be/cq7wpbgeoPE
EXPLOSION/ SCREAM SOUND EFFECT
"Dr. Strangelove (7/8) Movie CLIP - Kong Rides the Bomb (1964) HD"
by MovieClips
1:30 - 1:37
Downloaded from YouTube
https://youtu.be/snTaSJk0n_Y
WIND SOUND EFFECT
"Wind"
by Mark DiAngelo
Downloaded from SoundBible.com
EDITING PROCESS
As I was able to export the animation as an mp4 file once I had completed drawing it, there wasnt a great deal of editing required as the frames had already been pieced together and it played out exactly as I had planned which allowed me to simply import the whole video into PowerDirector instead of having to piece together each individual frame, saving me a lot of time.
The only problem that arose with the video once I imported it wasnt related to editing and was something I only noticed after watching the video through multiple times. When Luke's pupils shrink as he watches the Devil, the clouds behind him stopped moving. Because of this, I had to return to FlipaClip, take only that part from the original project and make a new project so that I could redraw the clouds.
Once I had exported the individual project with the clouds now moving, I added it back into PowerDirector and, once I had removed the section where the clouds were still, I placed the new clip directly into the video as I didn't need to adjust the length as it was the exact same as the previous clip.
Now that the video was exactly as I wanted it, I now turned my focus to, arguably the most element, the music. Besides the main song that I chose, there were two other sound clips that I wanted to use.
The first was a short clip taken from the scene in Dr. Strangelove where the bomb bay doors on whilst Major Kong is sat atop a bomb, attempting to fix the electrical wiring. I was originally going to use the sound clip of him straddling the bomb as he falls but I realised the section that I used fit much better.
The second sound clip I used was a wind sound effect that I found online for when Luke glides up through the clouds. Originally, I had the previous sound effect fade seamlessly into this sound effect but after watching it back and listening to feedback, I realised that it would be much better if there was a noticeable transition between the two pieces of audio. This way, the fade-in of the main song doesn't seem too abrupt.
However, an issue I had was that I wasn't entirely sure how to adjust how the audio faded in. The only way I knew how to do this was by dragging one of the audio clips over the next which gave me the option to add a cross-dissolve.
As I didn't know any better, I settled with this and exported the video. It was only once I showed this cut to my Dad on the TV that he brought up exactly what I feared. This led to a discussion where I asked him about the best way to adjust the audio fade-in and he explained the keyframe option that I had briefly attempted but ultimately failed at using and so he explained how to use it.
After this discussion, he showed me how to adjust the audio transition more precisely by using the keyframe option and so, what I did was, instead of dragging the clips over each other, I kept them separate and keyframed the volume of each audio clip to fit with the others so that the fade-in transition was smooth and exactly how I wanted it to be.

.jpeg)
.jpeg)